Realistic Summer Plans

Annddd we’re back. Phew that was a long time! But guess what, it’s over, exams are done and we’re free. Sort of. Thoughts are now turning towards summer and I’m getting excited and making all sorts of plans that I probably won’t actually do. We all do it – dream of adventures  that never actually happen; it might be money issues, timing, distance, who knows. We know it all too well with our 101 bucket list, it takes a lot of work to actually getting round to doing them! So in the interest of realism, I’ve made a list of 5 realistic plans everyone can make for this summer.

5) Dinner with friends – inside or out

5

Something I’ve started recently is having dinner with a group of friends every single week. Every Friday evening we get together at someone’s house, eat together and then just sit and talk for hours. Sometimes there’s games, sometimes there’s just company but every time it’s lush. Spend time with your friends and make a big thing out of it. Light some candles, decorate the table, make something adventurous.

 4) Go for a walk – somewhere surrounded by green

4

I would usually describe myself as a city girl but as soon as I’m back in green I realise I’m not at all. There’s something breathtakingly beautiful about countryside to me – the hills, the fields and the grass – it creates a sense of freedom. Go for a walk up a hill and just sit there and admire the view. No music or phones allowed. Just you, your thoughts and nature.

3) Stargaze

1It probably won’t be as spectacular as this and hand-holding is not essential but it’s not something we usually make time for and it’s a waste. I was doing my silver DofE a few years ago and a couple of us snuck out one night and lay on the grass covered in blankets looking at the stars. We were caught pretty quickly, given a good telling off and were sent back to bed, but it was still beautiful. If you’re in a city and stars are hard to come by there’s still so much to see, even if you’re just people watching.

2) Visit a local landmark

2

The chances are there’s somewhere near you that’s quite the tourist attraction, but you’ve never been. Go! There’s a reason it’s a tourist attraction so go and get your fill. For me, Stonehenge is on my list.

1) Cycle

3
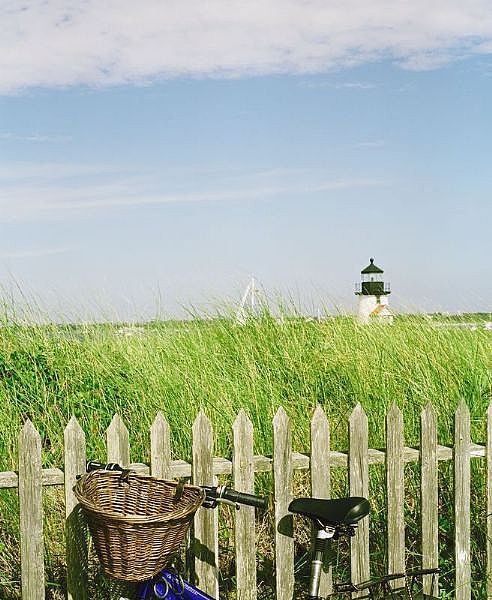
It’s a proven fact that exercise makes people happier. Find somewhere beautiful, take a bike or hire one, use a map, get lost, ask directions. If you see a little trail and wonder where it goes, follow it – you might discover something amazing.

Hannah

For more ideas for realistic summer plans, take a look at our board on Pinterest

Nail Fail

So you get to go home early because a lesson is cancelled. What do you do? Catch up with some homework? Use the extra time to study? Nope, you do your nails. Well I’m not exactly endorsing it but that’s what I did…
I’d seen a nail design on Pinterest where you drop nail varnish into a bowl and then swirl it to make a tie dye effect. Well, let’s say things on Pinterest always look easier than they turn out to be in real life.
1. Okay so first I painted on my white base coat and put sellotape around all of my nails so I didn’t get the nail varnish all over them
IMG_1177

2. I then dropped the nail varnish into a bowl of water (the clingfilm is just so I didn’t stain the bowl). This was my first obstacle: the nail varnish started to either sink to the bottom or just spread out and not mix with the other colours.IMG_1181

3. Even so, I persevered and place my nail on top of the swirly mess I’d created so far.
This was the best nail:

IMG_1182

You can see by middle finger that the rest were not so successful and I took it all off straight away and went for this more simplistic design instead:

IMG_1206

The moral of this story: Don’t underestimate the difficulty of things put on Pintrest. I’ve tested it and failed.

Katie

Eyeliner: Do’s & Don’ts

Although this is a very popular makeup trend at the moment, a lot of people still don’t completely know how to do it. I’ve put together a short list of do’s and don’ts with eyeliner but remember some of these are just my opinion and there are loads of different styles you can do…

winged-eyeliner

DO’s

  • Buy a good quality eyeliner 

It’s important to make sure you buy a well-known, branded eyeliner that won’t start cracking and rubbing off by the end of the day.

  • Find your favourite type of eyeliner

There are actually lots of different options when it comes to eyeliner. You can get liquid, gel or pencil. I personally prefer to use liquid or a liquid pen as it’s a more precise line but you can also achieve really good results with a gel liner or kohl pencil.

  • Practice

Before you wear it out for the first time, I would recommend you try it out a few times to get the right technique. The first time I wore eyeliner I drew it on about half an inch away from my actual eye.


DON’Ts

  • Draw it on too thick

You don’t want to end up with eyeliner across half your eyelid so make sure you keep fairly near to the lashline.

  • Severe Wings

If you are going to attempt a wing  you need to make sure it looks as effective as possible. It needs to be a consistent line from the corner of your eye right the way to the tip of the wing. Ideally, the wing will look like a continuation of your eye so you need to draw a line out from your waterline (your bottom lashline) to the desired length of the wing.

  • Forget mascara

Putting eyeliner on as an extra is all well and good but not if you forget to put your normal makeup on as well. There are loads of people who seem to think as they are wearing eyeliner they don’t need to wear any other makeup but you need to make sure you put mascara on as well to emphasise your eyes.

  • Give up

Eyeliner takes a long time to perfect and you can’t expect to get it right the first time. Liquid eyeliner is notoriously difficult to get right, but with a lot of practice you can achieve brilliant eyeliner every time!

Katie

Baby You Light Up My World Like Nobody Else

After writing the title of this, I used it as an excuse to put One Direction on shuffle. So that was the soundtrack to this entire post.

So Halloween is coming up and people have started having fancy dress parties. Hannah & I were invited to one yesterday (hence the reason this is being posted on Saturday) and we had to think up some costumes. Firstly, we tried to think of double acts we could dress up as. The best female couple we could think of was Mel & Sue of The Great British Bake Off. Not one of our most inspired ideas. Also, I’d have been Sue, so there was no way we were doing that. Instead, Hannah had already got a Peter Pan outfit her brother had already used and I vowed to make my own. After hours searching through Pintrest (not that I’m complaining) I couldn’t find anything either good or easy to make.  Then, an idea hit me. Or, to be precise, a Sims disk that’d been on a shelf by the computer.  So here’s the process of making the t-shirt for my costume:

IMG_0631

IMG_0632

IMG_0635

And here is the end result, I also hope you understand my title now:
DSC_0537IMG_0648

IMG_0649

IMG_0654

And as any good party should have (especially those on Made In Chelsea) there was quite a fair bit of scandal. Oh and overly drunk people. They kind of go hand in hand though.  So to summarise:

  • They were ex couples kissing
  • People that were never couples kissing – including two girls  who had drunk just a little too much ending up kissing each other.
  • One girl getting green paint all over arms. There was also a boy dressed up as the Incredible Hulk. I’ll leave it to your imagination how the green transferred from one to the other.
  • And lots of underage drinking.

So quite an eventful party. There was more, I just can’t think of any of it.
And to finish, another inspiring quote from One Direction:

You know, I know, you know I’ll remember you, and I know, you know, I know you’ll remember me, and you know, I know, you know I’ll remember you, and I know, you know, I hope you’ll remember how we danced. Something most of the people at that party probably won’t be doing a lot of – remembering.

Katie

Newspaper Nails

Another nail tutorial for you. This time its newspaper nails. If you have no idea what I’m on about:

DSC_1812

They are so simple to do, and, unlike many tutorials tell  you to, you don’t have to use alcohol – only water!

Okay first,

What you’ll need:

A nail file, coloured nail varnish for your base coat, a clear top coat, a small bowl of water, newspaper with text.

Newspaper Nails

1. Shape and neaten up nails

Using your nail file, shape your nails so they have no rough edges and are nicely shaped.

2. Paint your base coat. 

Make sure you leave it to dry for a while after you’ve painted it because it’ll smudge easily if you don’t once you put the design on.

3.  Cut up newspaper

Cut the newspaper up into small squares that cover the whole of your nail. Cut them all in one go so you won’t have to do it once you’re half way through doing your nails. I would do about 12 though in case some don’t transfer properly.

4. Dip each piece in water so it’s just damp.

Make sure it doesn’t get too wet because the ink won’t transfer.

5Press the newspaper firmly onto your nail

I do mean firmly too. Roll your nail underneath the newspaper in one go so you don’t get duplicated patterns.

6. Top coat

Finish off your design with a top coat. Again, I would wait a while so you don’t smudge the ink.

So there you go. If you try this yourself be sure to show us, we’d love to see how they turn out!

Katie

Prom Beauty Ideas

This week my best friend,who is in the year below me, asked if I would help her and her friends out for their prom. Of course I jumped at the chance to paint nails, do makeup and hair. Obviously everyone has different ideas of what sort of things they want to wear and how they want to style themselves for prom, but I thought I’d share with you some of the designs I did for them (and some extra photos for the hell of it…)

DSC_0834

Please excuse the weird plastic finger that I practice nail designs on…

But this is the design I came up with to go with my friend’s dress which as you can see matches the pattern on the waist.DSC_0428

To make the triangles even I used the low tack nail design tape I was talking about in another post back in May. But you can easily use sellotape to section off these parts. You can then use either a nail art pen or hair grips dipped in nail varnish for the dots. Make sure if you are using sellotape that you make it a little less sticky first because otherwise it make peel off the polish already on your nails.

This slideshow requires JavaScript.

One of her friends also had a blue dress but with diamante on so instead I painted some plain artificial nails with blue nail varnish and glittery tips:

This slideshow requires JavaScript.

In order to get a solid colour I had to paint 3 coats of the blue, but seeing as they were fake nails they can be left to dry for as long as needed without having to do everything with that weird hand position you have to use when you’ve just painted your nails. I then let them dry for an hour or so and carefully, in one stroke, did the tips. Although this sounds difficult, you get a much cleaner line and better shape if you do it all in one go.

If you don’t have anything like a plastic finger with them blu-taked on to paint the nails on, you can use any curved surface the right width to stick them onto. In the past I’ve either persuaded my mum to blu-tak them onto one of her fingers or stuck them onto a pencil which is secured to the table.

I would go into details about the hair and makeup but I have no pictures to go along with it so it might not make as much sense…

It was a really good night though but did make me a bit jealous that they got to go off to prom and I didn’t.

DSC_0380

Katie

DIY Spotty Nails

If like me you like to experiment with different nails designs, you’ve most likely attempted to do spotty nails before. Maybe if you’ve had the same amount of luck as me you’ll have turned out with randomly positioned blobs that have run or spread into each other that you just want to take off straight away because they look a total mess. Am I right?

Well, recently I found a very simple but amazingly effective solution to your nail varnish blobbing issues…

HAIR GRIPS (or bobby pins if you’re all American and that). 

I’m obviously not the first person to have realised this, and you may be reading thinking how stupid I am for just discovering it, but they work so well. Even though I’ve got nail art pens, which honestly I am so addicted to, hair grips are such a better way for getting accurate and precise circles on nail designs.

All you need to do is to dab a small amount of your chosen nail varnish, after applying your base colour, onto a tile or piece of plastic such as a lid (preferably not to any items currently in your fridge, I don’t want to get told off by any angry parents) and dip either the smaller or large circular end into it and apply immediately to your nail. I say immediately because otherwise it will dry and smudge across your nail, obviously not speaking from experience there… Then once they have thoroughly dried, apply a top coat to even out any imperfections and help the design to stay on longer.

You can then put loads of different colours on from your nail varnishes and not have to worry about buying new pens in that colour! Such a revelation I know.

I will have to make this short and sweet (mainly because I have no pictures of the nails I did using the hair grips) but I will be sure to post some more beauty pearls of wisdom for you…

Katie

HOW TO: Get Through Prom

So for most of you, exams should now be coming to an end, which, usually, means that prom is coming around. Unless of course, you went to my high school, and weirdly had it back in May. Or like my friend’s school, who have cancelled prom because too many people got drunk.

But for those of you about to go through the spectacular that is your first prom, take some advice from a girls who’s been there and done that. Learn from my mistakes so that your prom can be a night you’ll actually want to remember! So here are 10 tips, interspersed with some lovelies of Katie and I, mainly messing around …

1) Choose an outfit and hair that you really like, and wear your shoes in

My least favourite colour is purple. My prom dress was purple. What? Loads of people always ask me, why did you buy it then? I dunno, really. It was the first dress I tried on and I bought it on impulse. Hair is also another point you actually need to think about, because it won’t work out well if you just fluke it on the day and don’t even practice it beforehand. Then shoes. There’s nothing worse than shoes that are so painful, you look like a penguin when you walk, so make sure to practice walking around the house in them.

2) Get ready with someone

Seriously, getting ready on your own is no fun. If you’re going with a group of friends, choose the biggest house and all squash in! Excitement levels will definitely be higher if you’re not just wondering around your bedroom on your own in a pretty dress.

This is my favourite picture of us both

This is my favourite picture of us both, just for Katie’s face

3) Take lots of pretty pictures before you leave

By pretty, I mean, in front of a nice background. At our prom, a group of mine and Katie’s friends met up at my house and we stood in the very attractive setting of my conservatory for some photos. Just a couple of windows and a snooker table on the side. Not the best. We did also get some pictures outside of my house, which are so, so much nicer, but just make sure you’ve got a few nice shots, because  from the moment you step into the dimly lit hotel/restaurant/hall you’re headed too, the pictures will continue to get progressively worse as the night goes on…

4) Judge the people you’re with

Now I don’t mean as in judge their looks and questionable suits, but this is to do with valuables. If you’re thinking of taking a camera and your phone and some cash, just be aware that there may be some people in your year that will take advantage of the fact that their probably never going to see you again …

5) Don’t get there late

On our invitation to prom, it said that arrivals could begin from 7:30. We took that to mean arrive sometime after then. Apparently not. We arrived to an empty foyer and everyone else already there. Check what time it actually starts.

I case you're wondering from number , Liza's the one on the left. Shame.

I case you’re wondering from number 7, Liza’s the one on the left. Shame.

6) Don’t get overexcited

A lot of films make prom out to be this magical fairy-tale where everyone does ballroom dances and snogs in the corner. It’s not. It’s just everyone you go to school with chatting in fancy clothes. If you do end up having a waltz, lucky you, but more likely that that guy that’s been asking you for a threesome for the past three years will take the chance to grind on you. I know from experience.

7) Don’t get drunk

Prom is no place to get drunk. You can have just as much fun completely sober and still be able to remember it the next morning. If you’re desperate to get off your face, do it at an after party, but just remember that if you’re sick in someone’s hallway, people will remember that for a long time. *ahem Liza*

8) Bring deodorant and plasters

These are pretty self explanatory, but when you’re dancing away 1) you’re going to get sweaty and 2) you’re going to take your shoes off. Now it’s not that that’s the problem. It’s the moment at the end of the night and you’re about to leave and you realise ‘oh shit, I have to put those back on’. It’s painful.

And as Katie so nicely phrased it on Facebook 'chillin' with the Bentley'

And as Katie so nicely phrased it on Facebook ‘chillin’ with the Bentley’

9) If you’re going to an after party, keep your pants on

It’s all about reputation my dear

10) Let your hair down!

Don’t be one of the people that just sits around the edge of the dance floor and watches everyone else have fun. This is probably one of the last times you’ll ever see a lot of people, so loose your inhibitions, dance with that guy you’ve had a crush on for the past 5 years and have fun!

Hannah***

10 Ways To Get Clearer Skin

I recently cleaned out all of my makeup brushes thoroughly and was incredibly shocked by the amount of old powder that I got out!

DSC_0677

Disgusting I know!

Post-Cleaning

Post-Cleaning

Using them afterwards, they felt like new and it made me realise that I should really be cleaning them much more regularly. They need to be cleaned with a gentle shampoo in warm water every few weeks, this way you’ll use much less makeup because it won’t get clogged up in your brushes and you’ll have much clearer skin. This got me thinking about other ways you can get clearer skin without having to spend loads on treatments or expensive products that don’t work at all. So here’s 10 ways I’ve thought of to get clearer and spot free skin:

1. Use a gentle exfoliator at least every 2 days

The keyword here is gentle. A rough exfoliator, although it seems like a good idea, will actually do much more harm than good. Gently exfoliating will remove any dead skin without damaging too many layers.

2. Drink plenty of water

Now this is a controversial issue as so many people say different things. However, with a bit of careful research, the amount that kept coming up was roughly 1.2 Litres per day.

3. Avoid touching your face throughout the day

This will transfer oil and bacteria from your hands onto your skin and can cause blackheads and spots.

4. Get lots of sleep

A good eight hours every night will help your body to repair your skin from the inside out (they don’t call it beauty sleep for nothing)

5. Moisturise regularly

This will not only help to stop any UV damage caused by the sun and congestion from pollution but will help to lock in all of the goodness from the exfoliation.

6. Wash your face every day with warm water then close pores with cold water afterwards

Once you’ve exfoliated make sure you splash your face with cold water to close up your pores so that no unwanted dirt gets in and creates spots

7. Make sure your fringe is kept clean and ungreasy
Grease from your fringe is sometimes one of the worse contributors to bad skin on your forehead. The grease transfers onto your face during the day and, as there is no air getting to it, can create the perfect environment for spots to break out. So if you’re prone to it getting greasy and don’t want to be washing your hair every day, just wash your fringe over the sink in the morning with a small amount of shampoo.

8. Maintain a healthy diet with plenty of vitamins

  • Vitamin A is useful for repairing damaged skin so will get rid of any dryness or scaliness. Good sources of it are egg yolks, leafy greens, milk and carrots.
  • Vitamin E is a brilliant antioxidant so will help to remove toxins caused by your environment that are in your body. Sources of this include nuts, green vegetables and vegetable oils.
  • Vitamin C is another antioxidant and also stimulates collagen production. This means it will help to keep your skin looking healthy and young for a long time to come. Thankfully everything that’s high in this you probably already have in your diet: oranges, red peppers, blackcurrants, strawberries, broccoli and (this one I was surprised by) potatoes.

9. Don’t use makeup wipes with alcohol in

It’s best to try to avoid using makeup wipes all together but if you’re in rush or on the go make sure they are free from alcohol as this will undo all of the good work from your diet and cleansing routine.

10. Exercise for at least 15 minutes a day

This will not only help to make you healthy but make your skin look a lot healthier too. Just make sure that you cleanse thoroughly afterwards to get rid of any sweat.

One myth that I will happily bust for you though is that chocolate is bad for you skin! There is actually no proven scientific link between chocolate and breakouts. 

I hope these tips are useful to you! Please comment back on this post with any questions, advice or success stories!

Katie

HOW TO: Survive Revision

Woohoo!

There’s two reasons for this woohoo – we don’t give them out lightly. Firstly, this is the start of a brand new series – a ‘How To’ series. They won’t be coming on any sort of schedule so you’ll just have to keep your eyes open.

Secondly, it’s exam season again, and we all know what that means – procrastination. Which is what you’re doing right now. Don’t lie, even if you’re not revising, you’re avoiding doing something right now aren’t you … (I won’t lie either, I just procrastinated writing this by going over the last season of 90210 on Wikipedia)

But to make it worthwhile to your future, here’s a little guide of good advice for all you revising … people.

1) Go for a run

According to the internet, going for a run in the morning will awaken you brain and make it easier to remember things. According to me, it’ll make you so f*cking tired that you’ll have no choice but to stay sitting on that desk chair.

2) Eat food that’s tasteless

When you’re revising, your body will try anything to get away from the mind-numbing boredom by distracting you with your stomach. So you just need something to chew absentmindedly while watching the cat from next door try to catch a bird you revise. I’d say crackers because 1) they’re so dull you’ll give up on eating anyway and 2) they’re practically cardboard, so you’re not going to come out of study leave looking like Chris Moyles (pre-weight loss obviously)

3) Always have a book open

That way, every time your mum comes in to check you’re working, you can chuck your laptop under your bed and stare intently at it. Just make sure you change the page every time she leaves.

4) Keep away from the parents as much as possible

Teenagers and stress don’t really make a good mix , so keep a wide berth from the ‘rents and/or any other extremely annoying person in your life because they will make you angry and chances are, you’ll end up in tears.

5) Don’t be THAT guy

If you don’t know one of those guys then count yourself very lucky. Don’t be that guy that looks at people doing exams in the year below him and constantly tells him how they can’t possibly understand how hard life is for them and how their exam is a million times harder. No one likes that guy. Okay, if you’re in your final year of uni, GCSE kids look like the lamest thing ever, but this is the first time they’ve sat exams and their still at the stage where they care so don’t be mean.

6) Instagram the shit out of that textbook

Who doesn’t love a good lying-across-some-books-with-a-sepia-tint photo? I do.

7) Don’t lose your books – but if you do, just steal stuff

I know this from experience. It was around this time last year that I realised that I had lost all of my history books from a two year course. I then stole a textbook and preceded to revise the wrong subject (there’s another tip, always know what your exam is actually about). So keep track of your books and if you do, remember to thoroughly check the drawer where you keep them all. That’s where I found two of them four months later. There’s still two missing though …

8) Don’t paint your nails, then re-paint them, then take off the nail varnish because it wasn’t that good anyway

Don’t lie. You know you’ve done it at least once. Unless you’re a guy. In which case … don’t lie.

9) Get off all social media sites

Don’t even bother looking at them because no one will have messaged you – all your friends are probably also pretending to revise. And now is not the time to look through every single photo on that guy you like’s Facebook page. Especially because by the end, he’ll start looking extremely young and not very attractive at all, so it’s a lose-lose situation.

10) Stop reading this

Get off Bloglovin’ and open a book. Read at least one page before you start to find other things to distract your time with. And who knows, you might even achieve something in your life. If not, there’s always McDonalds.

Hannah & Katie

***